Thursday, December 31, 2009

Happy New Year

The New Year is just hours away...I hope that 2009 was a wonderful year for you and that 2010 will be even better. I'm wishing you the best from sunny Florida. When I went to the grocery store this afternoon it was 77 degrees. Wishing you were here? It's a little warm for me, it was cold enough to wear a sweater yesterday and I love winter clothes.

The grass is brown but the flowers in my yard are all in bloom. I picked a bouquet of roses and sunflowers today.


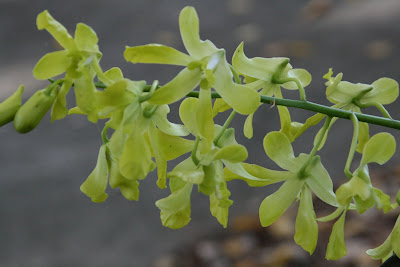
I rescued this orchid from Wal Mart for $2.00 on the "Oh my goodness I'm almost dead sale rack" last year and this is the beauty I got for my small investment. I had no idea what the bloom would look like when I purchased it...I am pleasantly surprised.

The ferns must think it is spring. They are sending up lucious lime green shoots.


The bouganvilla is so tall it is cascading over the tops of the orange trees. It won't be long before this fruit is ready to pick. I think I will try some in my ambrosia tomorrow.


The wildlife is out and searching for a winter meal. With watchful eye and quick reflexes this heron dove for many a minnow at the edge of the lake.


Mr. Squirrel Nutkin posed for his picture as he hid in the Bleeding Heart. This beautiful pink and red flower has crept through the grass for about fifteen feet and is covered with bloom.

Happy New Year to all my blogging friends. I wish you sunny days filled with love and happiness for the coming year.

Another fresh new year is here
Another year to live!
To banish worry, doubt, and fear.
To love and laugh and give.
This bright new year is given me
To live each day with zest...
To daily grow and try to be
My highest and my best!
I have the opportunity
Once more to right some wrongs.
To pray for peace and plant a tree,
And sing more joyful songs.
William Arthur Ward


Friday, December 25, 2009

Have Yourself a Merry Little Christmas

Christmas in here...all the hustle and bustle should be over now and we should be ready to relax and celebrate with our loved ones. I am hoping that you are with the ones you love this holiday season...and if they are far away this year, hold the memories of them close in your heart.

Wishing you Peace on Earth now and for the New Year.

Even though my girls are not here this Christmas they are still carrying on our family tradition of baking lots of Christmas cookies. Their mother, who is a excellent cook has taught them well.

I think they inherited a little of my artistic ability. Grammy thinks their cookies are beautiful.


Five Red Velvet Cakes. three Aunt Penni Pound Cakes and hundred of cookies later all the "sweets" are ready to be delivered to family and friends.


Bags of "White Christmas" line the buffet ready to go home with friends who stop by to visit.
Wishing You and Yours a wonderful Christmas filled with magic and love....May your Days be Merry and Bright...

Monday, December 21, 2009

Christmas Cinnamon Candy


Don't think the little things you do when your children are small won't always be remembered. My grown son, the New Year's Baby for 1970 told me the other day that the thing he really wanted for Christmas was the Hard Cinnamon Candy I always made when he was little. I started to laugh because a friend had just told me the day before that her son said he wished he could have some of the candy I always made at Christmas. I hadn't made any in years, but who could not honor those requests. It wasn't as easy as I thought it would be. I couldn't find any cinnamon oil. I always bought it at the drug store years ago, but they don't have it anymore. I finally found it at the Village Kitchen Shop in Lake Wales. I had forgotten how wonderful the house smelled after making the candy, and how the hot taste exploded in your mouth. Start a new tradition with your children this year, whether it be cinnamon candy or some other special thing that they will always remember.
Hard Cinnamon Candy
Mix and bring to a boil:
3 1/4 cups sugar
1 1/2 cups white corn syrup
1 cup water
2 teaspoons cinnamon oil
red food coloring
Add all ingredients to a heavy sauce pan and place on burner. Turn on high. Stir constantly with a wooden spoon. As soon as the mixture starts to boil, put in your candy thermometer. Do not stir anymore. When the thermometer registers in the middle of " hard Crack" 300 degrees, immediately remove from heat, take out the thermometer and add 2 teaspoons of cinnamon oil and the red food coloring and stir well. This must be done quickly. Pour onto a 12 x 12 piece of foil with the sides turned up and sprinkled with powdered sugar or a large cookie sheet or rectangular cake pan lined with foil. When cooled and hard, crack up and shake in a bag of powdered sugar. Store in an air tight container. Be careful when adding the cinnamon oil as vapors can burn your eyes and nose. After completely cooled crack into chunks with the back of a spoon. Put into two large baggies with powdered sugar and crack into smaller pieces. This recipe can be used for peppermint or any other type hard candy. I usually made red cinnamon and green peppermint or spearmint at Christmas. Enjoy!

Sunday, December 20, 2009

Fruitcake Cupcakes

Even though I only make it once a year, I love fruitcake....or I should say I love Mrs. Harvey's White Fruitcake. It's a little work and you get sticky fingers, but it is well worth the results when you get that wonderful aroma throughout your house while it is baking and when you take your first bite. Until two years ago, I always baked my fruitcake the normal way in a tube pan. Then my friend Jan K. said she baked hers in muffin tins. I tried it that year and that is how I do it now. There are pros and cons to baking it this way. You don't get that beautiful big cake to display on your holiday goodie buffet. Other than that, I think the cupcakes are the way to go. One fruit cake cupcake is just the right size for one serving of cake. They are easily frozen if any are left over and they are wonderful in February with a cup of coffee when there aren't as many sweets around. I also takes half the time to bake them. If you want a really good fruit cake give this one a try. I have been baking it for forty years, always with excellent results. It is just part of my family's Christmas traditions. Mrs. Harvey's White Fruit Cake

5 large eggs
1/2 pound butter
1 cup sugar
1 3/4 cups flour
1/2 tsp. baking powder
3/4 pound candied cherries
1 pound candied pineapple
4 cups pecans
1/2 ounce vanilla
1/2 ounce lemon extract
Chop nuts and fruits into medium sized pieces;dredge with 1/4 cup of the flour.
Cream butter and sugar together until light and fluffy. Add well beaten eggs and blend well. Sift remaining flour and baking powder together; fold into egg and butter mixture. Add vanilla and lemon extracts. Mix well then add fruits and nuts. Blend well. Grease a 10 inch tube pan. Line the bottom with waxed paper then grease again. Pour/spoon batter into prepared pan. Place in a cold oven and bake at 250 degrees for 3 hours. Cool on cake rack. Makes a five pound cake.

Or bake in muffin tins lined with cupcake liners. Spoon batter just to the top. Bake for 1 1/2 hours. Makes approximately 28 fruit cake cupcakes.

Thursday, December 17, 2009

Even though I have been baking for as long as I can remember, I have never made Biscotti until last night. It was really easy to make and the smell was heavenly. When you walked in the door the scent made you feel warm and snuggly inside. I tried two different kinds and I liked them both. Old Santa is ready to serve and eat these ......... Chocolate Walnut Brownie Biscotti


1/3 cup butter, softened
2/3 cup white sugar
2 eggs
1 teaspoon vanilla extract
1 3/4 cups all-purpose flour
1/3 cup unsweetened cocoa powder
2 teaspoons baking powder
1/2 cup miniature semisweet chocolate chips
1/4 cup chopped walnuts


Directions
Preheat oven to 375 degrees. Grease baking sheets, or line with parchment paper.
In a large bowl, cream together the butter and sugar until smooth. Beat in the eggs one at a time, then stir in the vanilla. Combine the flour, cocoa and baking powder; stir into the creamed mixture until well blended. Dough will be stiff, so mix in the last bit by hand. Mix in the chocolate chips and walnuts.
Divide dough into two equal parts. Shape into 9x2x1 inch loaves. Place onto baking sheet 4 inches apart.
Bake for 20 to 25 minutes in the preheated oven, or until firm. Cool on baking sheet for 30 minutes.
Using a serrated knife, slice the loaves diagonally into 1 inch slices. Return the slices to the baking sheet, placing them on their sides. Bake for 10 to 15 minutes on each side, or until dry. Cool completely and store in an airtight container.


These are really good, too. I got this recipe from Giada on the Food Network site. The friend I was making them for preferred walnuts to pistachio nut so I substituted with the walnuts.

Holiday Biscotti


Recipe courtesy Giada De Laurentiis
Ingredients
2 cups all-purpose flour
1 1/2 teaspoons baking powder
3/4 cup sugar
1/2 cup (1 stick) unsalted butter, room temperature
1 teaspoon grated lemon zest
1/4 teaspoon salt
2 large eggs
3/4 cup pistachios, coarsely chopped
2/3 cup dried cranberries
12 ounces good-quality white chocolate, chopped
Red and green sugar crystals, for garnish
Directions

Preheat the oven to 350 degrees F.

Line a heavy large baking sheet with parchment paper. Whisk the flour and baking powder in a medium bowl to blend. Using an electric mixer, beat the sugar, butter, lemon zest, and salt in a large bowl to blend. Beat in the eggs 1 at a time. Add the flour mixture and beat just until blended. Stir in the pistachios and cranberries.

Form the dough into a 13-inch long, 3-inch wide log on the prepared baking sheet. Bake until light golden, about 40 minutes. Cool for 30 minutes.

Place the log on the cutting board. Using a sharp serrated knife, cut the log on a diagonal into 1/2 to 3/4-inch-thick slices. Arrange the biscotti, cut side down, on the baking sheet. Bake the biscotti until they are pale golden, about 15 minutes. Transfer the biscotti to a rack and cool completely.

Stir the chocolate in a bowl set over a saucepan of simmering water until the chocolate melts. Dip half of the biscotti into the melted chocolate. Gently shake off the excess chocolate. Place the biscotti on the baking sheet for the chocolate to set. Sprinkle with the sugar crystals. Refrigerate until the chocolate is firm, about 35 minutes.

The biscotti can be made ahead. Store them in an airtight container up to 4 days, or wrap them in foil and freeze in resealable plastic bags up to 3 weeks.

Monday, December 14, 2009

Christmas with Friends

I grew up in a small town and still live there today. Oh, I have traveled and lived in different places, even as far away as Morocco many years ago, but my heart was always ready to come home. There is something to say about small town living....your family and friends are here. New people come and go, but there is a core group that you have known forever. They are the ones that you grew up with. They share your history, your laughter, your sorrows, and your secrets. (Thank goodness your know theirs, too!) Each year this group of friends gather together for a Christmas Breakfast. Most of us still live here all the time, and others travel home to attend. The group varies in size from year to year, and if you can't attend you send in pictures and words that you want others to share for you. Our breakfast was last Saturday. Twenty-six of us celebrated another year in our lives. We told of births, and death, and all the wonderful and not so wonderful things that the last year had brought to us. There was laughter and tears, and hope for the coming year.


When we get together it is like a soap opera. Twenty-six southern ladies with twenty-six tales to tell....and, there are some crazy things told. The winner this year told us that she was engaged to her ex husband, I think they have been divorced for about twenty years, but they have always remained friends. The wedding is planned for June....Awww...a June Bride for the second time. She is not one of the three above, that's me and my best friends from childhood. The one one the far right said we needed to get a good close up of her so that when she died we would have the picture to look at so we could get her makeup just right. God forbid she not look like the queen, (that's her grandma name, "Queenie" )when she's gone. You should have been around when she was trying to teach her granddaughter to say Queenie. It was say. cu, cu, cu, queeenie. I tried to get her to call her NeeNaw and if I offered her a "prize" she would call her that for awhile.

Breakfast was served buffet style and everything was wonderful. Breakfast casserole, sausage gravy and biscuits, grits casserole, fresh fruit, pastries, biscuits, homemade jam, coffee and mimosias. Now doesn't that sound like what they would have served at Tara? Sharon, the lady standing, was the hostess. Her lovely home was decorated from top to bottom and should have been on a tour of homes. China, silver, and crystal covered the tables...this was not a paper plate affair.
Though the dress was casual, the surroundings were elegant. The food was wonderful and love and laughter filled the room. In this fast paced world it is so good to come together and visit with old friends. For those of you who were not able to come this year, we all wish you a New Year filled with happiness and love. We will look forward to seeing you next December if not sooner.
One bragging Grandma...no, no, no..., not Grandma, she's going to be called "Honey" didn't bring pictures. She went across the street and brought back her best Christmas present this year. Isn't she beautiful. Just another little lady who will someday carry on the tradition of Christmas Breakfast with her friends.

Whoever you are and wherever you are...make contact with those you love this holiday season. Time slips away too fast. Share the memories, laughter and your love with your friends and family. Make new traditions and continue to honor the old. Don't have regrets for things you wished you would have done. Hoping you have a wonderful Christmas....go home for Christmas if you can, if not, travel there in your heart.


Friday, December 11, 2009

Cousin Annabelle


Meet Cousin Annabelle, the newest addition to the "SnowBelles" family. She's dressed in pink and black, which are very special colors for us Southern girls. They just make our cheeks look rosy. Annabelle can brighten up any Christmas tree with her happy face. She has antique buttons on her sparkly winter suit and carries a candy cane as a peace offering to make up for the devilish things she said to Gracie Anne last night. Gracie is still mad and wouldn't let us take her picture. Maybe after a relaxing weekend at the spa she will feel more photogenic. Look for more of these "Sistahs" to show up on my etsy site soon.

Wednesday, December 9, 2009

I play Bunco once a month with a group of friends. The majority of the group are Florida Gator fans. There is only one Florida State Seminole in the group. We had our Bunco group Christmas party last night. Along with the festivies we alway have an ornament exchange. The one Seminole got her revenge last night with this very creative ornament that was at the top of her gift bag. You had to open this before you got your real ornament. She went to the laundry mat and bought a small box of tide. Then she covered a toilet tissue roll with crimson ribbon and glued it to the top of the tide box. She then added the year. She said she wanted to put the score and add some tissue coming out of the roll for crying, but she was afraid to push it that far. So her very creative ornament brought back terrible memories......Roll Tide!


I thought I was the only artist in the group. I guess I was wrong. Speaking of art, I am the only one who makes her ornament every year. If you know anything about Bunco, you know that it is a dice game.....so I used dice for the pompom on Santa's hat and on the hanger. He is a jolly old fellow. I think won the pot last night!

Here is the first Bunco ornament I made. It was my exchange ornament last year. I had not made a picture of it. Lucky for me the hostess last night had last years ornament. It is entitled, Let the Fat Man Roll. You can't see it very well, but he is holding a gold dice in his hand.


We all had a great time last night. There was lots of good food, good friends, and many happy memories made. Oh yes, other than the trashy tide ornament a lot of beautiful ornaments were exchanged.

Monday, December 7, 2009

Lemon Cheese Yule Logs

Christmas is a time for wonderful memories. It is a time for love and hope. A time for family and a time for baking cookies. Christmas cookie making is a traditon in our family. I did it with my mother, my daughter and my grandchildren. We started long before Christmas and spent many happy hours in the kitchen making those delicious morsels to share with our friends. We tried many different kinds and always baked old favorites, but Lemon Cheese Yule Logs were my children's favorite and the only one that was good enough to serve to Santa on Christmas Eve.It was the one that always had the place of honor at many a Christmas Tea Party. It was Dollies favorite , too. She would share those cookies with the little girl who loved her. The one who loved her so much she kept her for fifty-five years. Then she shared them with the dolls of daughters and granddaughters.


Lemon Cheese Yule Logs graced many a table at festive parties at home. They went to school for Christmas parties and filled many Christmas tins and cookie trays.

The sound of laughter would always fill the kitchen at cookie baking time. Friends would come over and share in the fun. The smell of dozens and dozens of cookies baking filled the house with a wonderful aroma that could not be matched. Copper cookie cutters made wonderful shapes to be iced and decorated with silver balls and sprinkles galore.

Cookie baking is fun anytime you do it, but it is special at Christmas. During the year you will bake a batch of cookies, but at Christmas cookies overflow the buffet, the countertops and the diningroom table. Loved ones and friends come together to share in the fun. They are there for the joy of baking, but most of all to create memories that will last a life time. They are there for a tradition that will be pasted from one generation to they next. They are there for the enticing smell of cookies in the oven and the taste of that first warm cookie as it comes from the stove. Most of all they are there for the love they share with the other bakers and the love of cookies.


We now share Santa's Favorite Cookie and our favorite Christmas Cookie with you...please take this recipe and start a tradition with your children. Add it to your list....I hope it becomes your favorite cookie. too.
Santa's Favorite Cookie - Lemon Cheese Yule Logs

1 cup sugar
1 cup butter, softened
1 3 ounce Cream Cheese, softened
1 egg yolk
2 1/2 cups all-purpose flour
1 cup finely chopped pecans
1/2 teaspoon salt
1/2 teaspoon grated lemon rind
1 6 ounce package semisweet chocolate morsels
Decorator Candies
Combine sugar, butter: and cream cheese: cream until light and fluffy. Add egg yolk, beating well. Stir in flour, pecans, salt, and lemon rind. Mix well. Cover and chill at least 2 hours. Shape dough by tablespoons into w-inch logs by rolling between palms of hands. Place cookies on ungreased baking sheets, and bake at 325 degrees for 12 minutes or until lightly browned. Cool completely on wire racks.

Melt chocolate morsels in a small saucepan over low heat or in a small bowl in the microwave. Dip one end of each log in melted chocolate, and sprinkle with decorator candiesl Let stand on wire racks until chocolate sets. Store between layers or waxed paperin an air-tight container. Cookies may be frozen. Makes about 7 dozen.


ADO Ornament Swap

How lucky can a girl be? I received this wonderful ornament for Leslei Ann Young in the ADO Ornament Swap. Isn't she typical of every woman at Christmas...playing Santa Claus, running from here to there trying to take care of everything that should have been done yesterday, or the day before, but there were twelve other things that came up inbetween....decorating the house, presents to buy, and cookies to bake. I just love her Santa suit and the zany expression on her face. She will have a place of honor on my tree for years to come. This was a fun swap...I'm ready to do another one.

Thursday, December 3, 2009

Fresh Baked Bread

Remember when you were a kid and the lunchroom ladies baked fresh bread everyday? You could smell it all over the school. I liked mine with butter and a big dollop of peanut butter. My art room is in the same building as the lunchroom. In fact, the children eat right outside my door. So I get to smell fresh baked bread every day. It smelled and looked so good today, I couldn't resist taking a picture. See that corner where there are two missing...they sure were good with peanut butter this morning.

Wednesday, December 2, 2009

Michaels Photo Entry - Miz Luci

I have entered my snow lady "Miz Luci" in the Michael's Handmade Holidays Contest. Please follow this link and go and vote for her. Just click on how many snowmen you would like for her to receive under her picture. The more votes she gets, the better my chances of winning. You can see "Miz Luci" in my post from two day ago. All you talented artists who read this blog should enter. too. What can it hurt? Hope you'll help me out. Thanks so much!

Michaels Photo Entry - Miz Luci

Posted using ShareThis

PFATT GIVEAWAY


This just one of the wonderful prizes at the PFATT Giveaway. There are thirteen more that you have a chance to win. So hop on over to the PFATT sister's blog http://pfatt.blogspot.com and sign up to win.

Tuesday, December 1, 2009

Miz Luci

Miz Luci is ready for holiday cheer. She is an original ornament made for the ADO Ornament Swap and is on her way to her new home today. Made of polymer clay, Miz Lucie has tacks for her eyes and mouth and is dressed in the latest fashion colors. Her scarf is hand tied from eyelash yarns. Her fluffy feather hat will keep her warm through the long winter days to come. Miz Lucie is leaving sunny Florida and traveling to California. Let’s hope she doesn’t melt along the way.

Saturday, November 28, 2009

Gator Santa in the Swamp!


In honor of Christmas and the big game today, I give you "Swamp Santa".


"Swamp Santa" is an orginal one of a kind art doll created from polymer clay. The gator is approximately fourteen inches long. Santa rides on his back into the "Swamp" ready to bring a big win for the Gators today.

No red nosed reindeer to pull the sleigh
We have Tim Tebow to lead the way
Santa's riding in the "Swamp" tonight
On an old Bull Gator so hang on tight
And just to make it worth the trip
He brought the 2008 Championship!
You can find "Swamp Santa" on my Etsy shop!
Go Gators!

Wednesday, November 25, 2009

Happy Thanksgiving


Blessed are those who give without remembering and those who receive without forgetting.
Wishing you and yours a Happy Thanksgiving filled with love and wonderful memories shared with family and friends.

Friday, November 20, 2009

Ornie Give A Way

Sign up for the fabulous ornie give a way at http://becausewebelieve-art.blogspot.com/ You will love looking at the great ornaments from a group of talented artists and hopefully we will both win one. Just in time for the holidays....the season of love and giving.

Sunday, November 15, 2009

Mr. Crow

Mr. Crow flew in from Pennsylvania today and landed in sunny Florida. I bet he didn't expect to find a pumpkin patch here. Mr. Crow is the wonderfully creative art doll I received from Michelle of http://thestudioatcrowhavenfarm.blogspot.com/ in the Monsters in the Closet Swap sponsored by Zan of http://wildatheartart.blogspot.com/. Mr. Crow is dressed appropriately for the season in his wool plaid pants and his dashing scarf. When I found the package on my front porch this morning I couldn't
wait to open it and discover the treasure inside. I have been a long time admirer of Michelle's work, and am honored to own a piece of her art. I'm a kid at heart and I wanted to undress Mr. Crow to see how he was put together. He has a soft body and is bendable. I would like to find instructions on making this kind of doll. Right now, Mr. Crow is sitting in the pumpkin patch soaking up the air conditioning, a far sight from the cold he left behind. I hope likes his new home. I sure am glad he's here.

Wednesday, November 11, 2009

Frankie Baby


I know that Halloween is over, but I love Halloween all year long and I didn't get "Frankie" finished in time for his special day. So here he is...introducing "Frankie Baby". I've really enjoyed making Halloween ornaments this year. I just don't seem to have enough time to make everything that is in my head. Speaking of heads, Frankies is held on with old keys. He's quite the handsome dude, don't you think? I guess I should really start to concentrate on Christmas. My Bunco group has an ornament exchange each year and I need to get that started. I'm the only artsy person in the group so I make my ornament. Last year I made a Santa sitting on some dice. I haven't decided what to do this year, but I think I might make a roly poly Santa. I have only seven days until I'm out of school for our Thanksgiving break. Maybe I can have more time to be creative then.

Tuesday, November 10, 2009

Gator Bride and Groom


This Gator Bride and Gator Groom
Are ready for their honeymoon.
They've tied the knot
Sworn to be true
And always wear Orange and Blue.

I can't remember when I wasn't a Gator fan. I can still see my mother getting ready to go to the games when I was a little girl. She would always wear a suit and be dressed to the nines. Times sure have changed. When you visit the "Swamp" today all you see are jeans, shorts, and a sea of orange and blue. I couldn't think of a better way to celebrate my Gator heritage than to make some Gator dolls. These are the latest addition to my Etsy shop. This Gator bride and groom are cake toppers. They were a lot of fun to make. The first pair I made were more whimsical. I wanted these to be more realistic. I think they will be perfect for that couple who are Gator fans, too.

Saturday, November 7, 2009

Old Bones- Monster in the Closet

The monsters are on parade at http://wildatheartart.blogspot.com. There are scary ones, and cute ones, and some under the bed. Please go over and visit Zan as she presents the "Monsters in the Closet" parade.


Quiet! What's that rustling I hear?
I pull up the covers and cringe in fear.
From the deepest shadows there comes a sound.
Like something crawling along the ground.
Slithering, whispering, sighs, and moans
And the clattering sound of creaky old bones.
Deep in the closet, my worst nightmare
With grinning teeth and patchy hair.
Watching and waiting til the lights go out.
He's in there now, I have no doubt.
For this fun swap, you were to create the monster that lived in the closet that set you nerves on edge. This is "Old Bones". He is quite the scary fellow and I wouldn't want him rustling around among my shoes and clothes. He is created from polymer clay, bead bones and marble eyes. He sits on a painted wooden block, and is draped with tattered cheese cloth. This horror holds his own head, and I'm afraid he might want yours or mine.

Saturday, October 17, 2009

Wanderings

I just got home from the Florida Art Educators conference in Orlando this afternoon. I had a great time and went to some really wonderful, informative workshops. I can wait to bring back some of these lesson to my kids. The convention was at the Florida Hotel at the Florida Mall so inbetween classes there was lots of shopping going on. Not only did I buy things for me, I got some super deals on art supplies for my classroom. On Thursday night they had an artist bazaar where you could set up a booth and sell your wares. Meet "Bad Kitty", he was gone soon after I put him on the table, along with "Otis Ogre" and some of my "Little Jacks". I wish had made more ornaments. There was not problem selling them.
I didn't take Beatrice along for the trip. I left her at home to watch over my house while I was gone. Beatrice was made for the Halloween Mini Monthly challenge at Art Dolls Only. She has a paper mache body and polymer clay head and arms. Her dress is dyed gauze. Her purple hair is wool roving. Beatrice is a wandering witch, always on the search for new spells to cast. She follows the moon on her adventures.

I haven't been good at posting lately as I am sure you have noticed. I have been really busy at school. I have finally met three important deadlines there and hope to get back to creating my dolls and being more faithful here. Let's hope it works!

Saturday, October 3, 2009

Black Cats in Halloween Hats

Be sure to visit http://darklingwoods.blogspot.com/ for a Halloween give a way of "Soot" painted on a paper mache box. Hurry, hurry...the winner will be chosen on October 10.

Thursday, October 1, 2009

Thirty Days and Counting


I am in the holiday spirit. I can't stop making those crazy thing for Halloween, my favorite holiday. I have always loved to dress up and to make costumes. Today I made two Halloween paintings. Jack and Jill O Lantern and Mr. Skelly. I have a friend who works for a palette company and she brought me a stack of end pieces from the wood they use to make the palettes so I am recycling also. Both of the paintings measure 12 x 16. I added a little glitter and some rhinestones to give them a little sparkle when the light hits them. I think that first nip of cool air this morning really got me in the spirit. I can't wait for the weekend when all the creepy little critters and wonderful witches invade my house for the Halloween season.

Saturday, September 26, 2009

Otis Ogre


Otis Ogre mean and green
Roams the streets on Halloween
Scaring little girls and boys
Making a frightful, dreadful noise.
Stealing candy from their bags
Dancing with the witchy hags
Up and down the windy streets
Laughing, roaring
Trick or Treat
Otis Ogre is ready to hang on your Halloween tree. He is a funny scary little fellow and was fun to make. He is four by three and a half inches tall and five and a half inches when you include the hanger. Otis is the first in a series of my Halloween ornaments.


Monday, September 21, 2009

Introducing "Henri"


Henri is finally finished. He is my challenge piece for the ADO Mini Monthly Challenge. I am not a big fan of clowns, but I like Henri. He has a sweet, happy face, not at all like the last creepy clown I created. Henri was fun to make. He is nine inches tall and six inches wide, hand sculpted from polymer clay. His movable arms are attached with old buttons. He wears a beaded felt vest and an old lace ruffle around his neck. Henri would be considered a white face clown.
I have not made many dolls since I have been working on my house this summer. I finally got my artroom cleared out this weekend and hope to get to work real soon. It's time for ghosties, goblins, and things that go bump in the night.